Customize your Desktop with Rainmeter.

You may used to use Rocketdock, Objectdock and other software to customize your Desktop, but today I recommend you to use Rainmeter instead.

Hack Candy Crush Saga by Using Firefox extension

Infinite lives and boosts, all unlocked charms are bought, so what are you waiting for ?

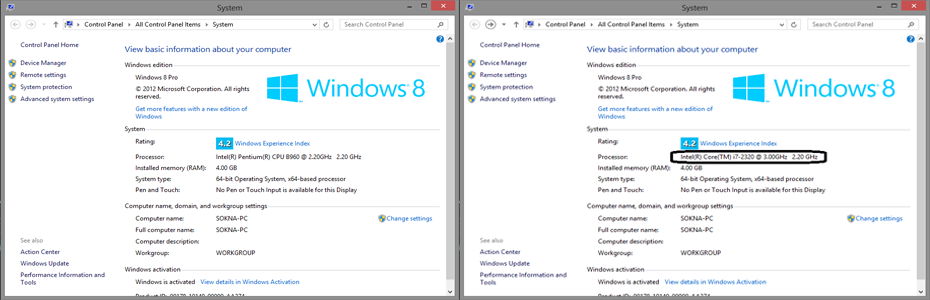
Fake CPU's name with regedit in Windows 7 and Windows 8

It looks so funny when I changed my Processor's Name to Intel(R) Core(TM) i7-2329 @ 3.00GHz. In fact, my processor is Intel(R) Pentium(R) CPU B960 @ 2.20GHz.Let's try together!

Showing posts with label Linux. Show all posts

Wednesday, March 19, 2014

How to build Wireless Mesh Kalua

Here are some steps of installing Wireless Mesh Network:

0)
* Click/Open ‘Models’
* Look at the router model # on the back of your router e.g. TL-WR1043ND
* Click/Open TP-LINK TL-WR1043ND
* Click/Open ‘Stable’
* Download ‘factory-image’ file (the link that contains ….image=factory at the end)
* rename the file to ‘firmware.bin’

1)
Unpack the router which comes from factory, apply the antennas and power-supply

2)
Connect your computer with a network-cable to the LAN-Ports of the router
and disable your wireless connection (often the LAN-Ports are grouped together and are yellow)

3)
Open your browser and use the IP-Address which is labeled on the bottom
of the device, e.g. http://192.168.1.1 - use the password which is also on this sticker

4)
go to the menu: SYSTEM-Tools -> FIRMWARE-UPGRADE
and select the already downloaded software-file and press Upgrade and wait 3 minutes (wait until the light on the router stops blinking)

5)
open in your browser this URL: http://192.168.1.1/admin.html and complete your configuration page. This router is now ready for usage.

6)
For advanced users, please visit http://192.168.1.1/index.html for more configuration options, e.g. special WAN-Options

A Very First Fedora Event in Cambodia

Our first event in Cambodia

Thank you for visiting our booth at DevInnoExpo yesterday. We were so excited to introduce you to Fedora Project. Fedora Project was first introduced to Cambodia in the last three weeks at FOSSASIA 2014 Phnom Penh at Open Institute and sponsored by the Development Innovations.

Chief of Party, Greata House was introducing Fedora Project and its history in Cambodia to Minister of Ministry of Education, Youths and Sport.


Our fans were holding I <3 Fedora tags and taking photos with smile.


What is Fedora Project?
Fedora is a Linux-based operating system, a collection of software that makes your computer run. You can use Fedora in addition to, or instead of, other operating systems such as Microsoft Windows™ or Mac OS X™. The Fedora operating system is completely free of cost for you to enjoy and share.
The Fedora Project is the name of a worldwide community of people who love, use, and build free software. We want to lead in the creation and spread of free code and content by working together as a community. Fedora is sponsored by Red Hat, the world's most trusted provider of open source technology. Red Hat invests in Fedora to encourage collaboration and incubate innovative new free software technologies.

Building Fedora Community

Since Fedora Project is the new project in Cambodia, and we would like to build a strong and big community to give support to our Fedora users and administrators. We are looking for people, who are currently using Fedora for their daily use, design project and web administrator and other related work to join our community.

If you are interested in our Fedora Community, please sign up here.

Saturday, February 8, 2014

How to enable WiFi in BackTrack 5r3 Virtual Machine

       Most of BackTrack's users who installed BackTrack 5r3 in Virtual Machine (VMware or Virtual Box) always have a problem with WiFi ( As below screenshot ):

       Today, I'm happy to show you guys how to enable WiFi in BackTrack 5r3. Please follow my several steps below:
Step1: Download driver at http://adf.ly/dFwht or http://bit.ly/1bZX0KO(make sure that you keep file in root directory).
Step2: After downloaded driver, now extract file using terminal:

  • Open terminal and type: tar xvjf compat-wireless-2009-12-11.tar.bz2

 Step3: File had been extracted. Now, it's time to run some commands in terminal as below:

  • cd compat-wireless-2009-12-11


  •  make unload (It will show some errors but just ignore it)


  •  make load

 Step4: Now driver has been installed. If you want to make sure whether it works or not, please open terminal and run iwconfig or ifconfig wlan0. If it works, it will show as below screenshot.

Finally, it works. :)
Video Tutorial:
Thanks for visiting my blog.