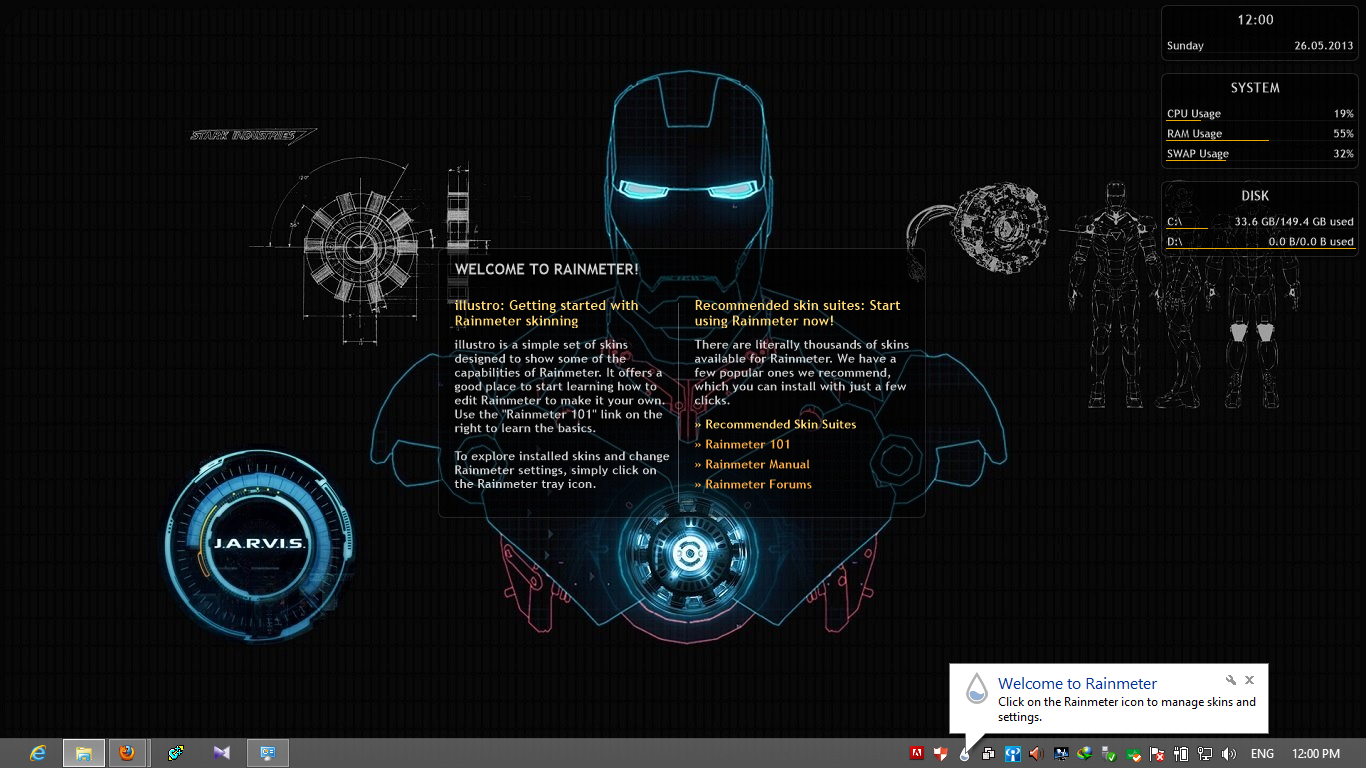
Customize your Desktop with Rainmeter.

You may used to use Rocketdock, Objectdock and other software to customize your Desktop, but today I recommend you to use Rainmeter instead.

Hack Candy Crush Saga by Using Firefox extension

Infinite lives and boosts, all unlocked charms are bought, so what are you waiting for ?

Fake CPU's name with regedit in Windows 7 and Windows 8

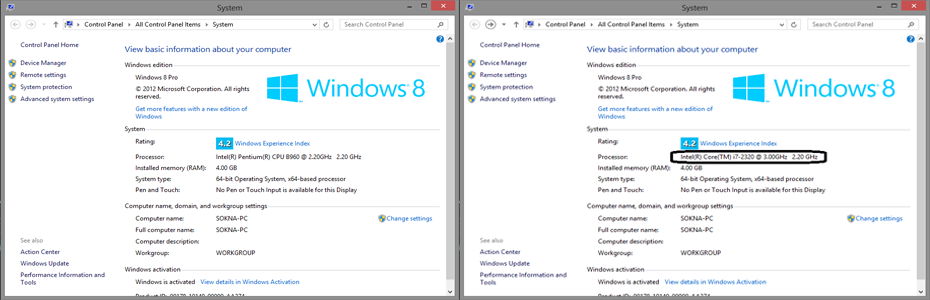
It looks so funny when I changed my Processor's Name to Intel(R) Core(TM) i7-2329 @ 3.00GHz. In fact, my processor is Intel(R) Pentium(R) CPU B960 @ 2.20GHz.Let's try together!

Showing posts with label Windows. Show all posts

Thursday, May 30, 2013

Fake CPU's name with regedit in Windows 8

It looks so funny when I changed my Processor's Name to Intel(R) Core(TM) i7-2329 @ 3.00GHz. In fact, my processor is Intel(R) Pentium(R) CPU B960 @ 2.20GHz.

Now I'm going to show you "How to fake Processor or CPU 's name with regedit in Windows 8".


How to:

Now please open regedit by Press Windows Key + R
Then please type regedit
Regedit Windows will appear


On the left Panel, you will see HKEY_LOCAL_MACHINE, then click on it
HKEY_LOCAL_MACHINE = >HARDWARE = > DESCRIPTION => System => Central Processor => 0

On the right-panel, click on ProcessorNameString


Now you can change your processor name whatever you want.
Example: I want to change my CPU from "Intel(R) Pentium(R) CPU B960 @ 2.20GHz" to "Intel(R) Core(TM) i7-2320 @ 3.00GHz". I just type Intel(R) Core(TM) i7-2320 @ 3.00GHz is enough.


Finally, I can change my CPU's name successfully and now My CPU name is Intel(R) Core(TM) i7-2320 @ 3.00GHz .
Thanks for visiting my blogspot.
Enjoy together :)

Tuesday, May 28, 2013

Share Internet connection from PC to other devices without using any software (Windows 8 only)

Unfortunately, Windows 8 has no longer make Ad-hoc network.It can, however, still an Internet connection.Now I'm going to show "How to share Internet connection from PC to other devices without using any software (Windows 8 only)".

By using Command Prompt(cmd), we can share Internet connection easily.
Now please follow a several steps:

Step 1: Check for compatibility to create hostednetwork

Right-click on Start Menu
Then click on Command Prompt(Admin)

 or
You can click on Start Menu or Press Windows Key
Then type Command Prompt or cmd
You will see the result on the left side, after that right-click on Command Prompt
Click on Run as administrator on the below tap


In the Command Prompt, you have to type the command to check your wireless card:
netsh wlan show drivers

After the process has finished, you need to focus on line Hosted network supported. If it equals Yes, it means you can share an Internet connect with hosted network, but it equals No, it means you can't share it.


Step 2: Create a hosted network


Make sure you are on Command Prompt Windows, if you aren't, just reopen it.
To create a hosted network to have to run this command:
netsh wlan set hostednetwork mode=allow ssid=networkname key=networkpassword

mode: Specifies whether to allow or disallow the hosted network.
ssid: Name of the hostednetwork.
key: The user security key used by the hosted network.

Example:I want to create a hosted network with Name=Everyday-Geeks and Password=wesharetoyou, so I have to run this command:
netsh wlan set hostednetwork mode=allow ssid=Everyday-Geeks key=wesharetoyou


After that, hosted network has been created. The next thing you have to do is start hosted network
by running this command:
netsh wlan start hostednetwork

Once  you see the line "The hosted network started", that means you created a hosted network successfully.


Step 3: Set up the network

After creating hosted network, you need to do the simple things to make it available to other devices:

  • Open "Network and Sharing Center" by right-click on network icon in system tray, then choose "Open Network and Sharing Center".


  • In Network and Sharing Network Windows, you can see Current network and Hosted Network. In my example, Current network is name "Smart Mobile" which is a Mobile Broadband connection; I have to click on its Connections: "Smart Mobile" (See the below screenshot). Additionally, I notice that my hosted network's Connections name is "Local Area Connection *12".

  • Then I should click on Properties in the new opened window.

  • In Properties window, I will choose “Sharing” tab then check the box “Allow other network users to connect through this computer’s Internet connection.
  • Below that is a drop down list, I will choose it and select “Local Area Network *12,” which is my new hosted network.
  • Finally, I just click OK button and wait for it to be finished.
In my below screenshot, I used my iPhone to connect hosted network and it works perfectly.

Enjoy together :)

Hack Candy Crush Saga by using Firefox extension

Today I'm going to show you "How to hack Candy Crush Saga by using Firefox extension".
Candy Crush Saga is a tile-matching puzzle game from King.com.
The cheat is included in the leethax.net Firefox extension.

Features

  • Infinite lives and boosts

  • All unlocked charms are bought

Notes

It's not possible to directly cheat unlocking new episodes. You'll have to bug your friends or support the game developers to unlock levels.
 This extension work for Firefox only.

How to

The thing you have to do is download Firefox extension from Leethax.net, then install it and restart Firefox is enough. :)

Now open Facebook, log into your account, and open Candy Crush Saga.

You will see what you have got. :)

Enjoy together :)


This Extension also works with:
For more details visit Leethax.net :)

Monday, May 27, 2013

Lock PC temporarily when someone log your computer with wrong password without using any softwares(Windows 7 only)


I'm going to show you "How to lock PC temporarily when someone log your computer with wrong password". Most of us always saved important data, files, documents... on our computer.If we away from our PC, somebody may try to login into our system by guessing the password.

To avoid this problem we can lock our PC temporarily by using "Windows Security Setting". By
using this option, our PC will lock automatically if someone entered wrong more than 3 times. This will make hard to guess the password to the particular person. If the person entered more than 3 wrong password, PC may get lock for next 30 minutes.

How to:

Click on Start Menu
Type Local Security Policy
Now click on "Local Security Policy"


From the left Windows Panel expand Account Policies
Then Double-Click on Account Lockout Policy
After that Double-Click on Account Lockout threshold

A new Windows will appear

In that Windows give the value after how many invalid password login attempts you want to lock you pc.


Now click Apply


Enjoy :)


Mac OS X 10.8 Mountain Lion on Vmware Workstation 9

Owning a Macbook or Apple product is always my dream. I dreamt on it, yet it is way too expensive for a student like me. Therefore, Hackintosh is a perfect solution for me.

Here, I am going to go through the steps of installing Mountain Lion on VM. It is an easy task.

You have to prepare these to start your work.
  •  Hackintosh Compatible Hardware :You must have an Intel CPU which has virtualization enabled.(You will get a guide on enable it on below.)
  • Installed VMware Workstation 9 :This is the platform I will go through.                          (VMware player works as well.)
  • OS X 10.8 Mountain Lion Retail VMware Image: Download from torrent. Download or Download
    Can't download this file? I recommend you to install this torrent software.
  • VMsvga2_v1.2.3.pkg: It is used for Mac display.
Now, let's go!

Step 1

Restart your computer and enter your bios.
Navigate to Advance Bios Feature and look for Virtualization Technology.
Enable it and you are done.

Step 2

Extract OS X 10.8 Mountain Lion Retail VMware Image.7z file.
You will get to see three folders.


OS X 10.8 Mountain Lion folder contains the image file.

VMware Unlocker - Hardware Virtualization Bypasser folder contains file that help you pass the restriction for VMware if your machine does not support Virtualization technology. (Most of us wouldn't use this.)

VMware Unlocker - Mac OS X Guest folder contains file to unlock Mac OS X Operating System in VMware workstation.


Step 3
Completely close your VMware Workstation.
Execute install.cmd in VMware Unlocker – Mac OS X Guest -> VMware 8.x Series -> VMware Workstation Unlocker - Windows folder.
Make sure to run it as administrator for it to work.


Step 4
Start your VMware Workstation. Go to File ->Open and Navigate to OS X 10.8 Mountain Lion.vmx and open it.


Then click Edit virtual machine settings to configure it.


Adjust your memory to at least 2GB and your processor to 2 cores as well as accelerate 3D graphics to provide a smooth environment.


Then, navigate to the Options tab to configure the operating system to Apple Mac OS X and version to Mac OS X 10.8 64-bit. This shows up after you successfully installed the install.cmd in step 3.


Step 5
Power on this virtual machine and follow the on-screen solution to set up your operating system.


After all sorts of clicking next and a few minutes of time, you finally succeed in login to Mountain Lion. Congratulations! But this is still not the end.


Step 6
You have to install VMware tools to have a better experience. So, we navigate to folder VMware Unlocker - Mac OS X Guest -> VMware 8.x Series -> Tools and mount darwin.iso.
 

Now, let's try to install VMware tools in Mountain Lion.

You probably will encounter error on finishing the installation.

But never mind, it is actually "installed". You can find it out after you restart your system.


Step 7
Now, you might encounter screen flickering while opening launchpad now. No worries, I got your back. Copy the VMsvga2_v1.2.3.pkg into Mountain Lion and runs it.

Here, you got yourself ready a HOT pancake!


You got no glitches now for your brand new Mountain Lion.

The Graphics here shows that you are currently using VMware SVGA II 128MB. It is the display to use with Mac OS after you successfully installed VMsvga2_v1.2.3.pkg.

Note 1. VMware couldn't detect your display card. It will only give your virtual machine a maximum of 128MB nVRAM. It is not really compatible with Mac OS, so we installed VMsvga2_v1.2.3.pkg.

and now

CONGRATULATIONS!

You can show off your hackintosh to your friends now.
It is just as smooth as real Mac with my current computer specifications. Just some lagging while launching the launchpad. This is not a real BIG deal.


Feel free to ask me any questions or give me any advice to make me better. Thank you.


Sunday, May 26, 2013

Turn your Desktop to Jarvis + Iron Man by using Rainmeter

To turn your Desktop to Jarvis + Iron Man, you have to download software that named Rainmete​r and other Skins. Click below link to download:
Rainmeter Official Site
Rainmeter Mediafire
Jarvis_.rmskin ( Mediafire )
Jarvis Wallpaper

* How to install
1. After you downloaded Rainmeter, please open it to install, then it will show like below screenshot:
2. The second thing you have to do after installed it is install its Skins(Download from above link). To install its Skins you just Double-Click on Jarvis_.rmskin, then click Install (See below screenshot)


3. Please wait a few second....After Jarvis_.rmskin was installed successfully, you will see as below screenshot:

4.Finally, you can turn your Desktop to Jarvis + Iron Man. :)

* Tips:
- For each Skins that you want to close just Right-Click on that Skin then click Unload Skin  (Right-Click => Unload Skin)
- You can move all skins to wherever you want
- You can turn your Desktop to another by downloading its skins from:
http://www.rainmeterskin.com
http://customize.org/
Enjoy together :)